Image source: YouTube
If you are using the modern interface (New Outlook or Outlook Web), the process is straightforward:
Note: If you do not see this arrow, you are likely using Classic Outlook, which uses a different method called "Delay Delivery." Read on to identify your version.
Managing your outgoing communication is a critical component of modern professional life. Whether you are working across multiple time zones, trying to maintain boundaries by not emailing colleagues on weekends, or simply preparing a batch of reports to go out at a specific hour, scheduling emails is a highly effective method for controlling your workflow.
However, Microsoft Outlook 365 users frequently encounter a major point of frustration: the instructions they find online do not match the software on their screen. The "Schedule Send" button appears to be entirely missing. This confusion stems from Microsoft's ongoing transition between different software architectures. Depending on whether you are using the legacy desktop application, the modernized cloud-based application, the web browser version, or a mobile app, the feature has a different name, a different location, and entirely different technical requirements for delivery.
This comprehensive resource will guide you through scheduling emails across all current versions of Outlook 365, explain the critical differences between client-side and server-side delivery, and provide actionable troubleshooting steps if your scheduling features are missing or malfunctioning.
Before attempting to schedule an email, you must identify which version of Outlook is currently active on your device. Following a tutorial for the wrong version is the primary reason users fail to find the scheduling tools. As of 2026, Microsoft supports two primary desktop experiences for Windows users, alongside web and mobile platforms.
According to official Microsoft documentation, the scheduling feature is handled entirely differently depending on your interface. Use the comparison below to determine your version.
This is the traditional, robust Windows application that has been the standard for years.
This is the modernized, cloud-first application designed to mirror the browser experience.
If you are accessing your email through a web browser (outlook.office.com), you are using Outlook Web, which functions identically to the "New Outlook" desktop application. If you are on a Mac, you are using Outlook for Mac, which has its own specific interface detailed later in this article.
If you have identified that you are using New Outlook or Outlook Web, you are utilizing Microsoft's cloud-based infrastructure. This is widely regarded as one of the most convenient ways to schedule mail because the processing happens on Microsoft's Exchange servers, not on your local machine.
Click "New Email" and fill out the recipient, subject line, and body text exactly as you normally would. Ensure any necessary attachments are fully uploaded.
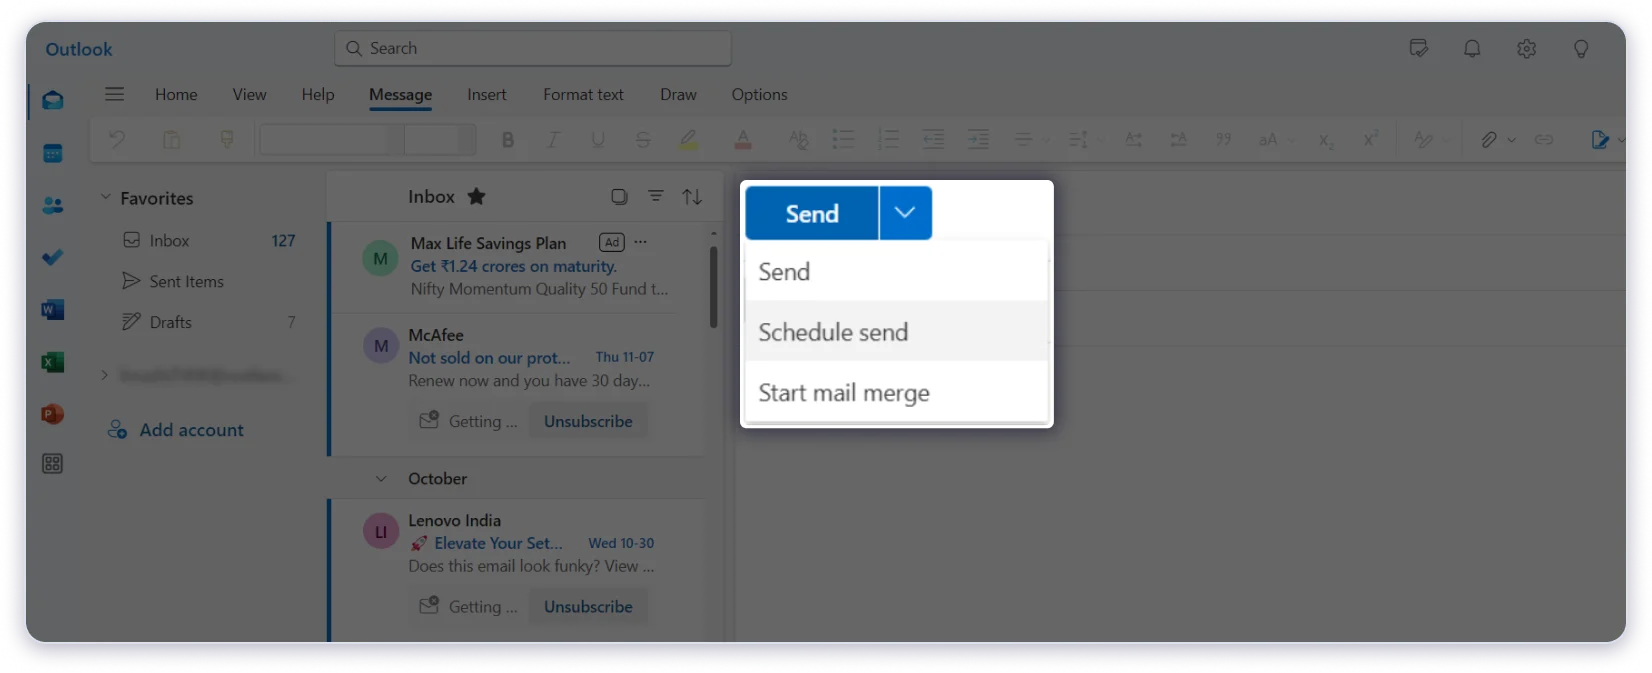
Look at the bottom of the composition pane. Next to the primary blue "Send" button, you will see a small downward-facing arrow (v). Do not click the main Send button, or the email will dispatch immediately.
Click the arrow to open the dropdown menu and select Schedule send.
A dialog box will appear offering several preset times (e.g., "Tomorrow morning at 8:00 AM"). If these do not suit your needs, click Custom time to open a calendar and clock interface where you can specify the exact date and minute for delivery.
Click Send in the scheduling dialog. The composition window will close.
Where does the email go? In these modern versions, your scheduled email is moved to your Drafts folder. It will remain there, marked with a red timestamp indicating when it is scheduled to depart. Because this process is handled by the cloud server, you can safely close your browser, shut down the Outlook application, or turn off your computer entirely. The email will still send at the designated time.
For users operating the legacy Classic Outlook application, the process is notably different. Classic Outlook is a client-side application, meaning it relies heavily on your local computer's processing power and active connection to manage email queues. In this version, the feature is called "Delay Delivery."
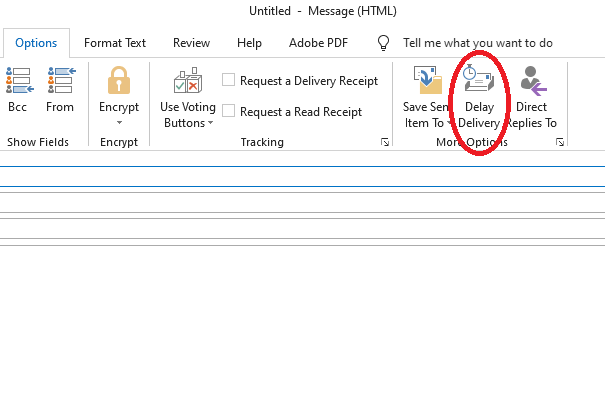
While composing your new email, look at the ribbon at the top of the message window. Click on the Options tab.
In the "More Options" group on the ribbon, click the button labeled Delay Delivery. This will open the Properties dialog box.
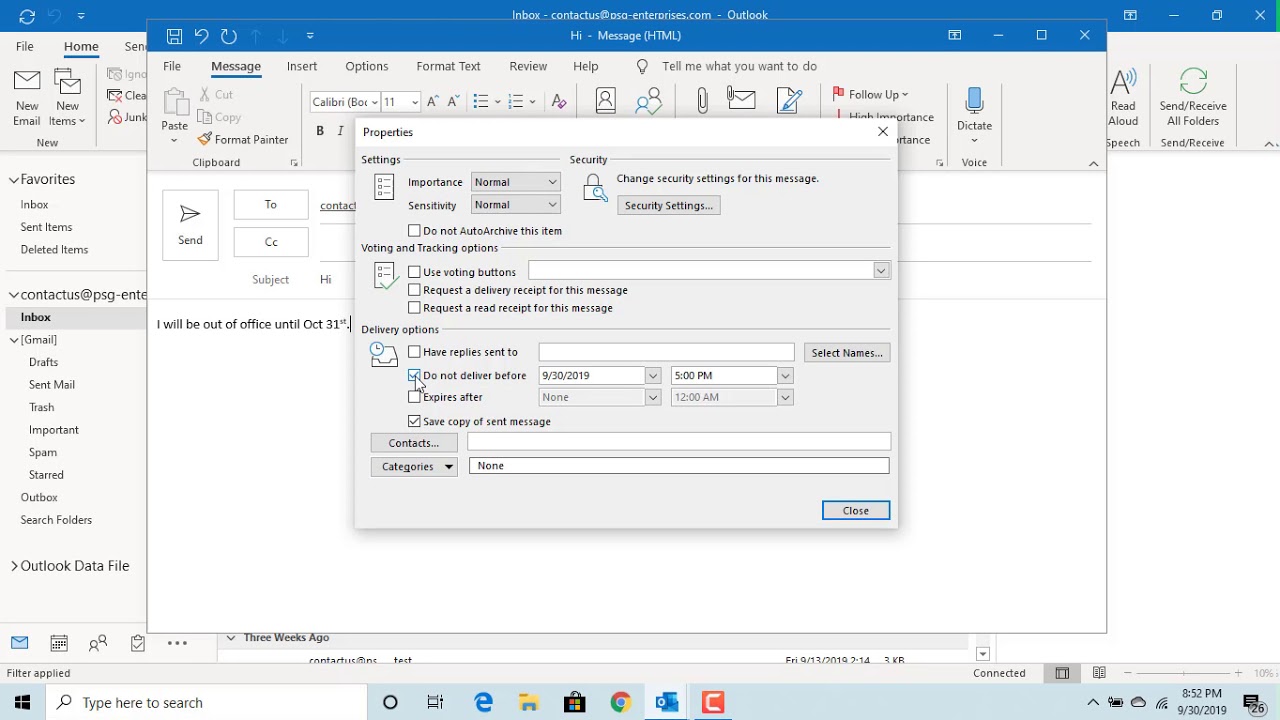
Look under the "Delivery options" section of the dialog box. Check the box next to Do not deliver before. Use the adjacent dropdown menus to select your desired date and time.
Click the Close button on the Properties dialog box. You will return to your email draft. Finally, click the main Send button.
When you use Delay Delivery in Classic Outlook, the message is routed to your Outbox folder, not your Drafts. Your computer must remain powered on, and the Classic Outlook application must remain open for the email to send. If you close Outlook or your computer goes to sleep, the email will remain trapped in the Outbox and will only send the next time you open the application.
This client-side limitation is a frequent source of missed deadlines. If you need to schedule an email to go out over the weekend while your workstation is powered down, you must use Outlook Web instead of the Classic desktop application.
If you have identified your version of Outlook but still cannot find the scheduling tools, you are likely encountering a configuration issue or an account limitation. According to discussions on Microsoft Q&A forums, there are several common culprits for a missing schedule button.
This is the most common reason the "Schedule send" arrow is missing in New Outlook. The modern scheduling feature relies on Microsoft Exchange server protocols. If you have connected a third-party email account (such as a personal Gmail, Yahoo, or an ISP-provided email) to New Outlook using IMAP or POP protocols, the scheduling feature is completely disabled. The dropdown arrow simply will not appear. To schedule emails, you must be using a Microsoft Exchange account (like an Office 365 work/school account or an Outlook.com address).
In Classic Outlook, the "Delay Delivery" button can sometimes be accidentally removed from the ribbon. To restore it, right-click anywhere on the ribbon and select Customize the Ribbon. Ensure that the "Options" tab is checked in the right-hand column. If the button is still missing, you can click the "Reset" button at the bottom of the customization window to restore all default tabs and commands.
If you are working within a corporate environment and sending from a "Shared Mailbox" (e.g., info@company.com), your IT administrator may have restricted certain features. Depending on how the shared mailbox is mapped to your primary account (automapping vs. secondary Exchange account), Delay Delivery may not function correctly. If the button is grayed out while using a shared address, you will need to contact your IT department to adjust your delegate permissions.
For Classic Outlook users, Delay Delivery requires "Cached Exchange Mode" to be active. If your Outlook is operating in "Online Mode" (often configured by enterprise IT for security or storage reasons), the Delay Delivery feature may be unavailable or unreliable. You can check this by going to File > Account Settings > Account Settings, selecting your email, and clicking Change. Look for the "Use Cached Exchange Mode" checkbox.
Microsoft has expanded the scheduling functionality across its entire ecosystem, though the interface varies slightly on Apple devices and mobile platforms.
The Mac version of Outlook operates similarly to the New Outlook for Windows, utilizing a streamlined interface. According to documentation from Penn State University's IT department, the process is straightforward:
Like New Outlook, these messages are stored in your Drafts folder and are processed by the server, meaning your Mac does not need to stay awake for the delivery to occur.
Mobile scheduling is a highly requested feature that Microsoft recently integrated into its smartphone applications. Because mobile operating systems aggressively manage background app activity to save battery, local client-side scheduling is impossible on a phone. Therefore, mobile scheduling is entirely server-side.
You can safely force-close the Outlook app or turn off your phone; the Exchange server will handle the delivery.
Circumstances change, and you may need to revise a scheduled email or cancel it entirely before the delivery time arrives. The method for intercepting a scheduled message depends entirely on where it is stored.
Because these versions store scheduled mail in the Drafts folder, they are very easy to manage.
In Classic Outlook, scheduled emails are held in the local Outbox queue.
Beyond simply picking a time on a calendar, mastering Outlook's scheduling capabilities can provide strong productivity benefits and protect your professional reputation.
Have you ever clicked "Send" and immediately realized you forgot an attachment or made a glaring typo? While New Outlook has a built-in "Undo Send" toggle that delays emails by up to 10 seconds, Classic Outlook allows you to build a much more robust safety net using Rules.
You can create a global rule that applies a 1-minute or 2-minute delay to every single email you send. This gives you a brief window to open your Outbox and delete the message before it actually leaves your computer.
With remote and hybrid work becoming standard, the lines between professional and personal time have blurred. If you prefer to clear your inbox on a Sunday afternoon, sending those replies immediately can create a culture of "toxic productivity," where colleagues feel pressured to respond on their weekend. Using Schedule Send to batch your Sunday replies for Monday at 8:30 AM is a top-tier option for maintaining your own workflow without disrupting your team's work-life balance.
While native Outlook requires you to click through calendar menus to pick exact dates, some users prefer a faster, text-based approach. Third-party add-ins like Boomerang for Outlook integrate directly into the ribbon and allow for natural language inputs. Instead of finding a date on a calendar, you can simply type "Next Tuesday at 10am" or "In two weeks," and the tool will calculate the exact delivery time. This is a highly competitive option for power users who schedule dozens of emails daily.
If you use Classic Outlook and frequently schedule large batches of emails, you may notice the application hanging or freezing during the delivery window. According to Microsoft Community support threads, this is often caused by a conflict between the Outbox queue and the automatic Send/Receive interval. If Outlook is trying to process a scheduled email at the exact same moment it is running its routine 5-minute server sync, the application can lock up. To resolve this, go to Send/Receive > Send/Receive Groups > Define Send/Receive Groups, and adjust the automatic sync interval to a less frequent schedule (e.g., 15 or 30 minutes) to reduce background processing collisions.
It depends entirely on your version of Outlook. If you use Classic Outlook (desktop app with a File tab), yes, your computer must be on and the app must be open. If you use New Outlook, Outlook Web, or the mobile app, the email is stored on the cloud server and will send even if your devices are completely powered off.
In New Outlook and Outlook Web, scheduled emails are held in your Drafts folder. In Classic Outlook, they are held in your local Outbox folder. You can visit these folders to edit or cancel the messages before the scheduled delivery time.
No, Outlook does not have a native "recurring email" button built into the compose window. To send the same email automatically every week or month, you must use Microsoft Power Automate to create a flow, or utilize a third-party add-in designed for recurring messaging.
If the option is visible but grayed out (unclickable), it usually indicates a permissions issue. This frequently happens when trying to send from a Shared Mailbox where you have "Send on Behalf" permissions rather than full "Send As" permissions. It can also occur if your Outlook is disconnected from the Exchange server (working offline).
No. The recipient will only see the time the email was actually delivered to their server. There is no metadata or tag visible to the recipient indicating that the message was drafted days or hours in advance using the Delay Delivery or Schedule Send features.
Scheduling emails in Outlook 365 is a powerful capability, but success requires understanding the specific mechanics of the version you are using. The fragmentation between local client processing and modern cloud processing is the root cause of most scheduling failures. By identifying your software version first, you can ensure your communications are delivered exactly when intended.
Take a moment right now to open your Outlook application, locate the specific scheduling button for your version, and send a test email to yourself scheduled for five minutes from now to verify your setup is working correctly.