How to Schedule an Email to Send Later in Every Version of Outlook
In New Outlook & Outlook Web: Compose your message, click the dropdown arrow next to the Send button, select Schedule send, and choose your desired date and time. The email will wait in your Drafts folder.
In Classic Outlook (Windows): Compose your message, go to the Options tab on the ribbon, click Delay Delivery, check the box for Do not deliver before, and set your time. The email will wait in your Outbox (Note: Your PC must remain turned on).
Which Version of Outlook Are You Using?
Before you can schedule an email to send later, you must identify which version of Microsoft Outlook you are currently using. Over the past few years, Microsoft has been transitioning users from the traditional desktop application to a modernized, web-based interface. This transition has created significant fragmentation in how features are named, where they are located, and how they function behind the scenes.
If you are looking at a tutorial designed for the wrong version, you will likely find yourself searching for buttons that do not exist on your screen. Microsoft uses two entirely different sets of terminology for this feature: "Schedule Send" and "Delay Delivery."
According to official Microsoft documentation, the user interface and storage locations differ fundamentally based on your platform. Here is a breakdown to help you identify your version and understand the core differences in how scheduling operates.
| Feature | Classic Outlook | New Outlook / Web |
|---|---|---|
| Visual Cues | Has a "File" menu in the top left corner. Sharp window corners. | No "File" menu. Has a "View" or "Settings" gear icon. Rounded corners. |
| Feature Name | Delay Delivery | Schedule Send |
| Waiting Folder | Outbox | Drafts |
| PC Must Be On? | Yes (Client-side) | No (Server-side) |
| IMAP Support? | Yes | No (Currently disabled) |
Once you have identified whether you are using the Classic desktop application or the New/Web interface, you can proceed to the specific instructions tailored for your setup below.
How to Use Schedule Send in the New Outlook and Outlook Web
If you are using the New Outlook for Windows, Outlook on the Web, or Outlook for Mac, the process is highly streamlined. Because these versions share the same underlying codebase, the steps are identical across all three platforms. This method is widely regarded as one of the most reliable ways to schedule emails because it operates on the server side—meaning you can schedule the email, close your laptop, and trust that it will send automatically.
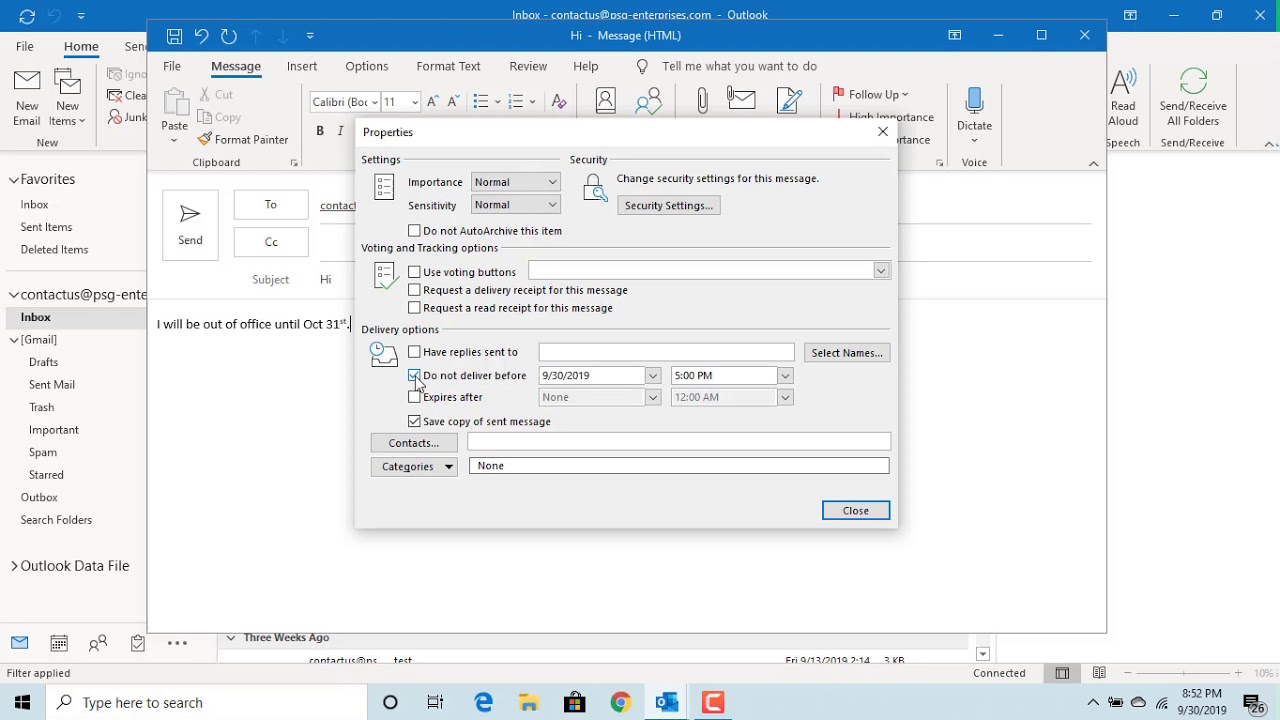
Image source: YouTube
Step 1: Compose Your Message
Click the New Email button and draft your message, add your recipients, and attach any necessary files just as you normally would.
Step 2: Locate the Dropdown Arrow
Look at the primary blue Send button at the bottom or top of your composition window. Directly to the right of the word "Send," you will see a small downward-facing arrow (or a chevron). Click this arrow.
Step 3: Select Schedule Send
A small context menu will appear. Click on Schedule send. A dialog box will pop up offering you a few preset times (e.g., "Tomorrow morning at 8:00 AM").
Step 4: Choose a Custom Time
If the preset times do not fit your needs, click Custom time. A calendar and clock interface will appear, allowing you to select the exact date and time you want the email to be dispatched. Click Send to confirm.
Once confirmed, the email window will close. Unlike older versions of the software, your pending email will not go to the Outbox. Instead, it will be stored in your Drafts folder. It will remain there, marked with a red timestamp indicating when it is scheduled to depart, until the server automatically sends it.
How to Use Delay Delivery in Classic Outlook for Windows
For users who rely on Classic Outlook (the traditional desktop application included with Microsoft Office installations), the feature is called "Delay Delivery." This version of the software has been the standard for decades, and its scheduling mechanism is deeply tied to the local application rather than the cloud.
Because Classic Outlook is a robust desktop client, the scheduling options are buried slightly deeper within the message properties menu. Here is how to configure a delayed message.
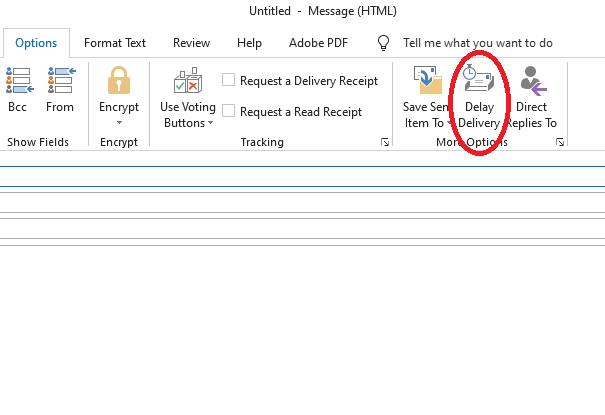
Image source: GMass
Step 1: Open a New Message Window
Click New Email to open a separate composition window. Fill out your "To" field, subject line, and email body.
Step 2: Navigate to the Options Tab
At the top of the message window, click on the Options tab in the ribbon. Look for the "More Options" group (usually located toward the right side of the ribbon).
Step 3: Click Delay Delivery
Click the Delay Delivery button. This will open the Properties dialog box for that specific email.
Step 4: Set the Delivery Parameters
Under the "Delivery options" section, you will see a checkbox labeled Do not deliver before. Ensure this box is checked, then use the dropdown menus to select your desired date and time. Click Close on the dialog box.
Step 5: Click Send
Return to your message window and click the main Send button. The message will disappear from your screen and move into your Outbox folder, where it will wait until the specified time.
Why Your Computer Must Stay Awake for Classic Outlook to Work
If you are using the Classic Outlook method described above, there is a critical technical limitation you must understand to prevent embarrassing communication failures. Classic Outlook handles scheduled emails as a client-side operation.
When you click send on a delayed message in Classic Outlook, the email is stored locally on your hard drive inside your Outlook data file (PST or OST). The application essentially sets an internal alarm clock. When the time arrives, the local software pushes the email out to the server.
According to IT documentation from the University of Oregon, if your computer is asleep, powered off, or if the Outlook application is closed when the scheduled time passes, the email will simply sit in your Outbox. It will not be sent until the next time you turn on your computer and open the Outlook application.
Strategic Advice: If you need to schedule an email to go out at 3:00 AM, or while you are on a flight with your laptop powered down, you should log into Outlook on the Web via your browser to schedule that specific message. Web-based scheduling is handled server-side, meaning Microsoft's cloud servers will dispatch the email regardless of the status of your personal hardware.
Why Can't I Find the Schedule Send Button?
One of the most common frustrations reported in Microsoft community forums is the sudden disappearance of the scheduling feature. Users often know the feature exists, but cannot locate the button on their interface. If you are struggling to find the option, it is almost certainly due to one of two reasons: account limitations or ribbon configuration.
The IMAP/POP Account Limitation
If you are using the New Outlook for Windows and you have connected a personal email account (such as a Gmail, Yahoo, or custom domain address) using the IMAP or POP protocols, the "Schedule Send" feature is programmatically disabled.
As confirmed by Microsoft support representatives on the Microsoft Q&A forums, the modern scheduling API currently requires an Exchange-based backend to function. Because IMAP accounts do not sync with Microsoft's Exchange servers in the same way, the dropdown arrow next to the send button will simply vanish when you are composing an email from an IMAP address. To regain this functionality, you would need to use the Classic Outlook application or rely on a third-party add-in.
Ribbon "Noise" and Collapsed Menus
If you are using a supported Exchange or Outlook.com account but still cannot see the button, your ribbon might be collapsed. In the New Outlook, if your window is not wide enough, the interface hides secondary buttons. Try maximizing your window. Alternatively, check the "Options" tab in the top ribbon of the New Outlook—sometimes the "Schedule Send" button is placed there as a standalone icon rather than a dropdown next to the main Send button, depending on your specific layout settings.
How to Find and Edit Your Scheduled Emails Before They Send
Scheduling an email is only half the battle; frequently, you will realize you need to add an attachment or change a typo before the message actually goes out. Because of the version fragmentation discussed earlier, finding your pending emails requires checking different folders.
If you used New Outlook or Outlook Web:
Navigate to your Drafts folder. You will see your scheduled email sitting there. However, you cannot simply click into the text body to edit it. You must click the Edit icon (which looks like a small pencil) located near the scheduled time notification. Clicking this pencil will cancel the scheduled send, open the draft for editing, and require you to re-schedule the email once you are finished making changes.
If you used Classic Outlook:
Navigate to your Outbox folder. Double-click the message to open it. You can edit the text or add attachments directly. However, opening the message pauses the delivery mechanism. After making your edits, you must click the Send button again to return it to the Outbox. If you want to cancel the delay and send it immediately, go to Options > Delay Delivery, uncheck the "Do not deliver before" box, close the properties, and click Send.
How to Delay Every Email You Send Using Outlook Rules
While scheduling individual emails is useful for timing your communication, many power users prefer to set up a universal "Safety Net." This involves creating a rule that automatically delays every single email you send by a few minutes. This acts as a highly effective "Undo Send" feature, giving you a brief window to catch forgotten attachments, typos, or "reply-all" mistakes before the email actually leaves your computer.
To set up a universal delay in Classic Outlook, follow these steps:
- Click on the File tab in the top left corner of the main Outlook window.
- Select Manage Rules & Alerts.
- Click New Rule...
- Under the "Start from a blank rule" section, select Apply rule on messages I send and click Next.
- If you want this to apply to *every* email, do not check any condition boxes. Just click Next. Outlook will warn you that this applies to all messages; click Yes.
- In the actions list, check the box for defer delivery by a number of minutes.
- In the bottom pane, click the underlined text "a number of" and type in your desired delay (e.g., 2 minutes). Click OK, then Next.
- (Optional) Add exceptions. A popular exception is to check "except if it is marked as importance" and select "High". This allows you to bypass the delay for urgent emails by marking them as High Importance.
- Name your rule (e.g., "2-Minute Safety Net"), ensure "Turn on this rule" is checked, and click Finish.
Now, every time you click send, the email will sit in your Outbox for two minutes before departing, giving you ample time to open it and stop the delivery if you realize you made an error.
Can You Schedule Emails on the Outlook Mobile App?
Yes, scheduling emails is fully supported on the official Microsoft Outlook mobile applications for both iOS and Android. The mobile app operates similarly to the New Outlook and Web versions, meaning the scheduling is handled server-side. You can schedule an email from your phone, turn your phone on airplane mode, and the email will still be delivered successfully.
To schedule an email on a mobile device:
- On iOS (iPhone/iPad): Compose your message. Instead of tapping the Send icon (the paper airplane), press and hold the icon for a second. A menu will slide up from the bottom of the screen offering a "Schedule Send" option.
- On Android: Compose your message. Tap the three vertical dots (the overflow menu) in the top right corner of the screen. Select "Schedule Send" from the dropdown list.
Just like the web version, these scheduled messages will reside in your Drafts folder until the designated delivery time.
Troubleshooting the "Hanging" Outbox Issue
A frustrating issue occasionally plagues Classic Outlook users: an email is scheduled, the time passes, the computer is on, but the email remains stubbornly stuck in the Outbox. This is often referred to as a "hanging" Outbox.
If you encounter this, it is usually related to how your local client communicates with the mail server. According to troubleshooting discussions on the Microsoft Community forums, the most common fix involves adjusting your Send/Receive group settings.
First, verify that you are not in "Work Offline" mode. Check the bottom right corner of your Outlook window; if it says "Working Offline" or "Disconnected," go to the Send/Receive tab on the ribbon and click the "Work Offline" button to toggle it off.
If you are online but the email is still stuck, check your automatic sync settings:
- Go to the Send/Receive tab.
- Click Send/Receive Groups, then select Define Send/Receive Groups at the bottom of the list.
- Ensure the box for Schedule an automatic send/receive every [X] minutes is checked.
- Set the value to something reasonable, like 5 or 10 minutes. If this is unchecked, Outlook may not actively check the Outbox to see if a scheduled email is due for delivery unless you manually click the Send/Receive button.
Frequently Asked Questions
Does my computer need to be on for Outlook to send a scheduled email?
Where is the "Schedule Send" button in the New Outlook?
Why is "Delay Delivery" greyed out or missing in my Outlook?
How do I change the time of a scheduled email after I've clicked send?
Can I schedule a reply to an email, or only new messages?
Is there a limit to how many emails I can schedule?
Key Takeaways
Mastering the ability to schedule emails allows you to respect colleagues' working hours, manage your own workflow, and ensure critical messages land at the top of an inbox at exactly the right moment. Because Microsoft is currently supporting multiple versions of Outlook, understanding your specific platform is the key to success.
- Identify your version first: Look for the "File" menu to determine if you are using Classic Outlook or the New Outlook interface.
- Use Web for reliability: For "set it and forget it" reliability, use Outlook Web or New Outlook, as they process scheduled emails on the server side.
- Keep Classic open: If you use Classic Outlook's "Delay Delivery," remember that your PC must remain powered on and connected to the internet.
- Check the right folder: Pending emails live in the Drafts folder in New Outlook, but reside in the Outbox in Classic Outlook.
- Build a safety net: Classic Outlook users can leverage the Rules wizard to create a universal 1-minute delay, acting as a powerful "Undo Send" mechanism.