How to Make a Google Sheet Editable for Specific People or Everyone with a Link
Google Sheets is one of the most powerful collaboration tools available, but its default security settings are intentionally strict. When you create a new spreadsheet, you are the only person who can view or modify the data. If you want to collaborate with colleagues, collect data from a community, or build a shared project tracker, you need to understand how to change your document's permissions.
Navigating these settings can sometimes be frustrating. You might send a link to a coworker only for them to hit a "View Only" wall, or you might want to share a document publicly without letting strangers delete your complex formulas. Balancing seamless collaboration with data security requires knowing exactly which permission levers to pull.
- Open your Google Sheet and click the blue Share button in the top right corner.
- Look under the General Access section.
- Click the dropdown menu and change "Restricted" to Anyone with the link.
- Change the role dropdown on the right from "Viewer" to Editor.
- Click Copy link and share it with your collaborators.
Before diving into the advanced workflows, it is crucial to understand the three distinct permission levels Google offers. According to official Google documentation and expert guides, these roles dictate exactly what a user can do:
- Viewer: The user can read the data, scroll through tabs, and see charts, but cannot make any changes, leave comments, or alter formatting.
- Commenter: The user can view the data and leave feedback via comments or suggested edits, but cannot directly alter the core data or structure.
- Editor: The user has full access to type in cells, delete data, change formatting, add new tabs, and (depending on your settings) invite other people to the document.
How to Change Permissions to Make a Google Sheet Editable (The Quick Method)
If you are working on a desktop computer (Windows, Mac, or Chromebook) and need to quickly open up your spreadsheet so that anyone who receives the URL can jump in and start typing, you will use the "General Access" settings. This is the fastest way to bypass individual email invitations and get straight to collaborating.
Here is the detailed, step-by-step process for changing these permissions:
- Locate the Share Button: Open your spreadsheet in your web browser. In the extreme top-right corner of the screen, you will see a prominent blue button labeled Share. If the document is currently private, this button will display a small padlock icon. Click this button.
- Navigate to General Access: A dialog box will appear in the center of your screen. The top half is for inviting specific people, but you want to look at the bottom half, labeled General Access.
- Remove the Restriction: By default, this section will say "Restricted," meaning only people explicitly added in the top half can open the link. Click the word "Restricted" to open a dropdown menu, and select Anyone with the link.
- Assign the Editor Role: Once you change the access level, a new dropdown menu will appear to the right, defaulting to "Viewer." Click this dropdown and select Editor.
- Distribute the Link: Click the Copy link button in the bottom left of the dialog box, then click Done. You can now paste this link into an email, a Slack message, or a text message.
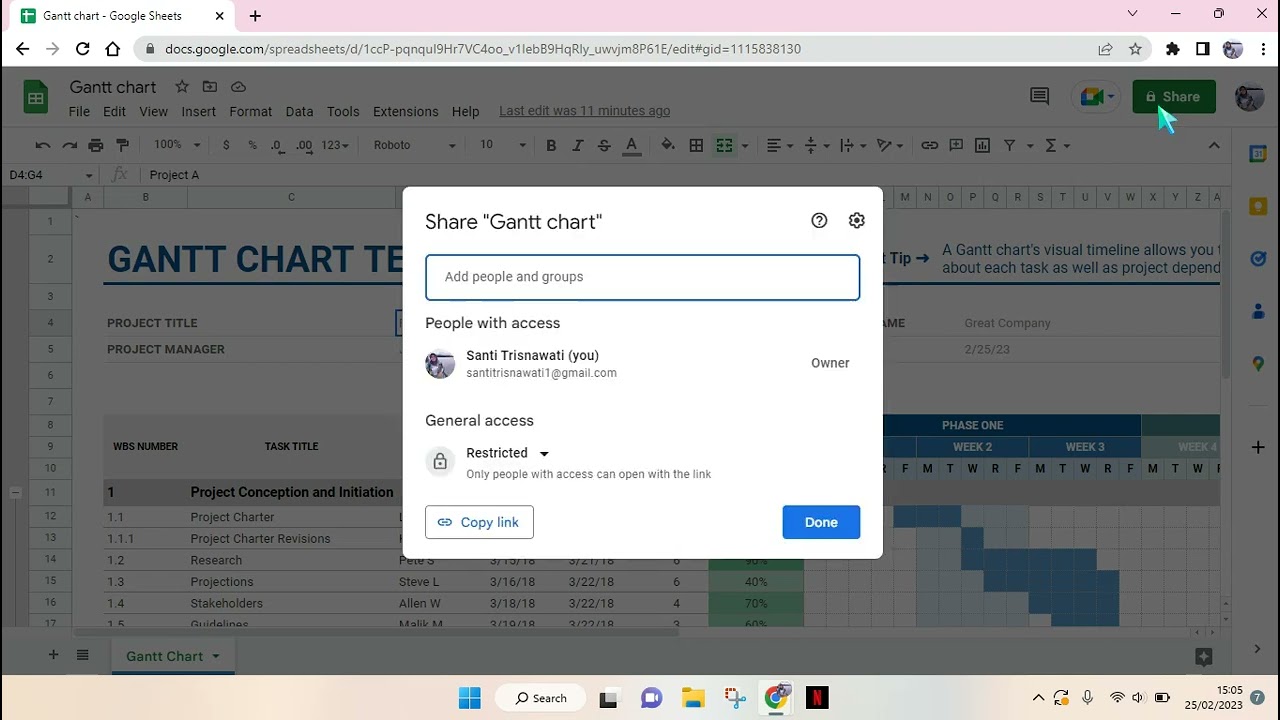
Image source: YouTube
Once you complete these steps, the padlock icon on the blue Share button will change to a globe icon, indicating that the document is now accessible to the public. Anyone who clicks your link will immediately be able to click into a cell and start typing.
How to Share Your Google Sheet with Specific Collaborators
While the "Anyone with the link" method is fast, it is not always secure. If you are handling sensitive financial data, private client information, or internal company metrics, you should never use a public link. Instead, you need to invite specific Google accounts. This ensures that only verified individuals can access the document, and it provides a clear audit trail of who made which changes.
To invite specific people, click the blue Share button. In the top text box labeled "Add people and groups," type the email addresses of your collaborators. As you type, Google will suggest contacts from your address book. Once you select a contact, ensure the dropdown menu next to their name is set to Editor.
When you add specific people, you will see a checkbox labeled Notify people. Leaving this checked allows you to type a custom message explaining what you need them to do in the spreadsheet. When you click "Send," they will receive an email containing your message and a direct link to the file.
Advanced Owner Settings for Better Security
As the owner of the document, you have additional administrative controls hidden behind the gear icon in the top-right corner of the Share menu. Clicking this gear reveals two critical security settings:
- Editors can change permissions and share: By default, anyone you make an Editor can also invite new people to the document. If you want to maintain strict control over the roster of collaborators, uncheck this box.
- Viewers and commenters can see the option to download, print, and copy: If you are sharing proprietary data and want to make it harder for people to steal it, uncheck this box. This disables the ability to copy cells or download the file as an Excel or PDF document.
| Feature | Restricted Access (Email Invites) | Anyone with the Link Access |
|---|---|---|
| Security Level | High (Requires Google Login authentication) | Low (No login required, easily forwarded) |
| Audit Tracking | Shows specific names in Version History | Shows "Anonymous Animals" in Version History |
| Ease of Use | Requires manual entry of every email address | One-click sharing via URL |
| Best Use Case | Internal teams, private data, financial records | Public surveys, open-source resources, quick drafts |
Image source: YouTube
How to Make a Google Sheet Publicly Editable for Anyone with the Link
There are legitimate scenarios where you want a spreadsheet to be a free-for-all. Community sign-up sheets, potluck organization lists, public brainstorming sessions, or open-source data collection projects all benefit from frictionless access. If you require people to log into a Google account just to type their name on a potluck list, you will likely see a massive drop-off in participation.
However, making a sheet publicly editable comes with significant security risks that you must prepare for. If you post an "Anyone with the link can edit" URL on a public forum like Reddit, a Facebook group, or a public website, that link can be indexed by search engines. Furthermore, automated bots frequently scrape the internet for open Google Sheets to inject spam links or maliciously delete data.
When you use the "Anyone with the link" setting, users who click your link without being signed into a Google account will appear in your document as anonymous avatars. You will see icons in the top right corner labeled "Anonymous Cheetah," "Anonymous Axolotl," or "Anonymous Kraken." Because they are not logged in, Google cannot verify their identity. If you need to know exactly who is typing what, you must use the specific email invitation method instead.
The Safety Net: Using Version History
If you choose to make a sheet publicly editable, your primary defense against vandalism or accidental data deletion is the Version History feature. Google Sheets automatically saves every single keystroke and change made to the document, allowing you to roll back time if something goes wrong.
To access this safety net, click File in the top menu bar, hover over Version history, and select See version history. A panel will open on the right side of your screen showing a chronological list of every edit session. Clicking on a previous timestamp will show you exactly what the sheet looked like at that moment. If a public user deleted your entire dataset, you simply find the version from before the deletion, click the three dots next to the timestamp, and select Restore this version.
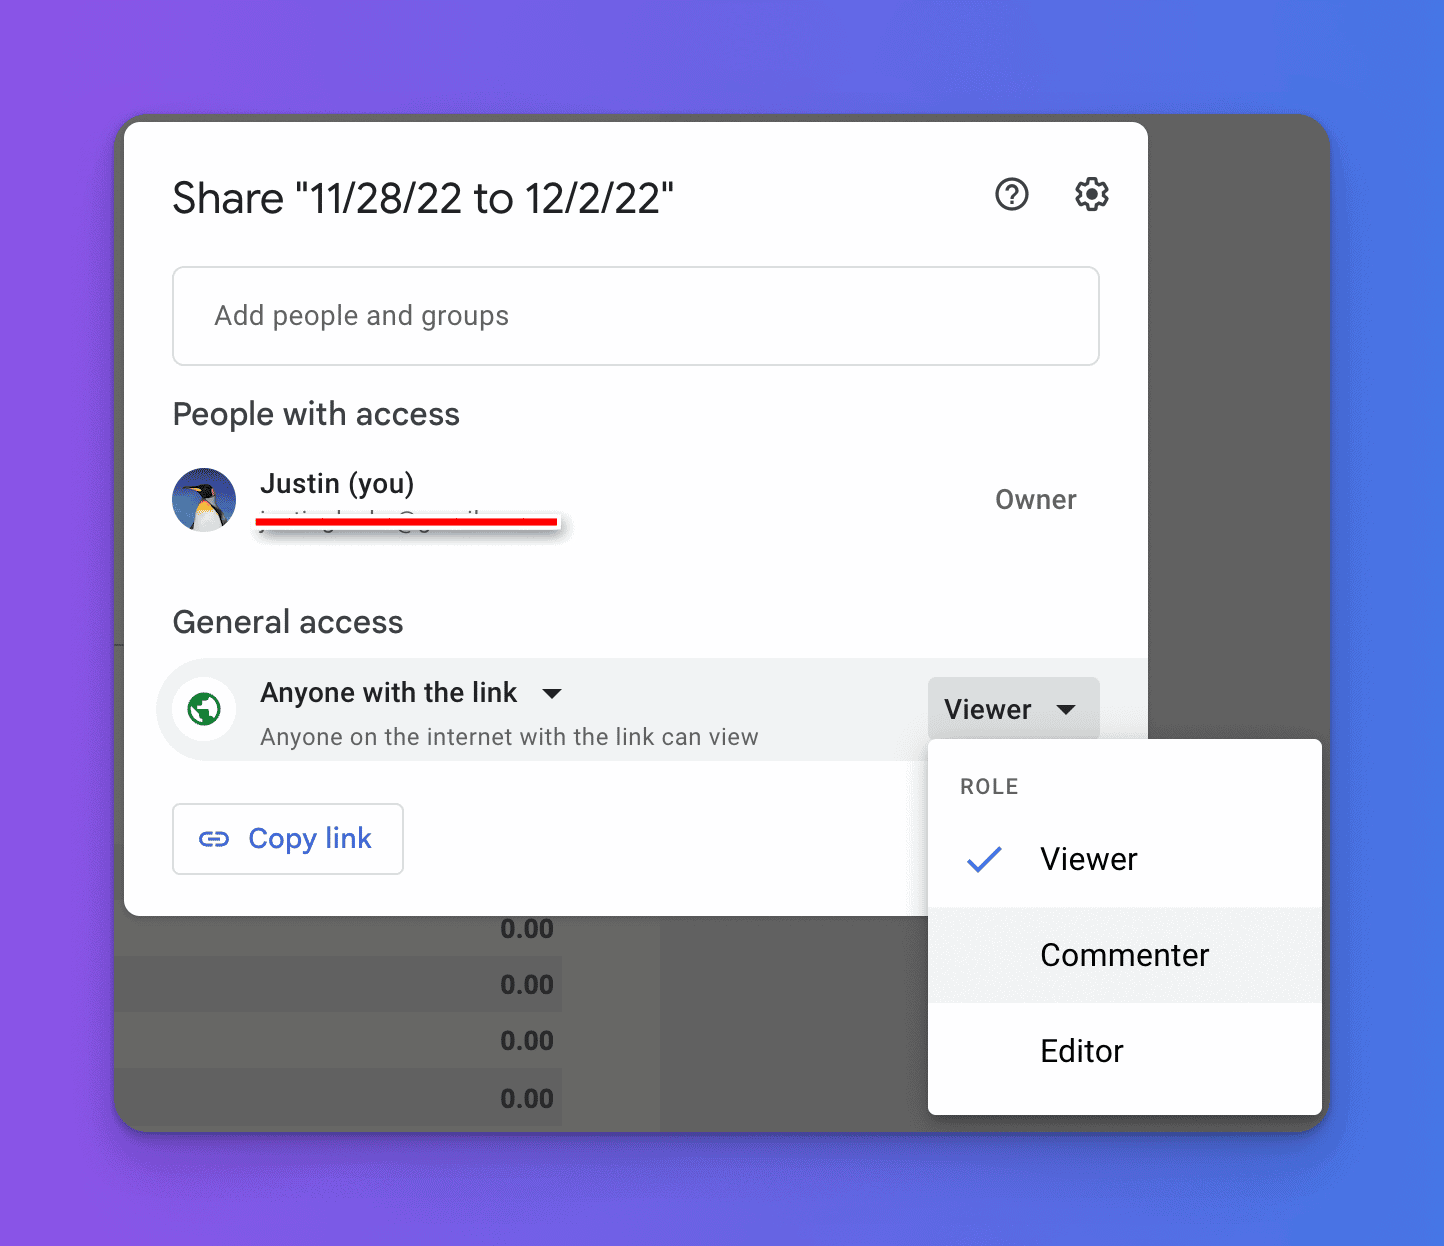
Image source: Gold Penguin
How to Make a Google Sheet Editable on the Mobile App (Android and iOS)
A common point of frustration for users is trying to change permissions while away from their computer. The prominent blue "Share" button that exists on the desktop browser version of Google Sheets does not exist in the mobile app. The interface is entirely different, and the permission settings are hidden behind a few extra taps.
Whether you are using an Android device or an iPhone, the steps to make a sheet editable via the mobile app are identical:
- Open the Google Sheets app and tap on the spreadsheet you want to share.
- Tap the three vertical dots (...) located in the top-right corner of the screen to open the document menu.
- Tap on Share & export from the list of options.
- Tap on Manage access. This screen will show you the current permission status.
- Under the "General access" section, tap the current setting (which likely says "Restricted").
- Tap "Restricted" again to open the selection menu, and choose Anyone with the link.
- The app will update the permissions. Once updated, tap the role (which will default to "Viewer") and change it to Editor.
- Tap the link icon in the top right corner of this screen to copy the URL to your phone's clipboard.
Because the mobile interface is more condensed, it is easy to accidentally leave the setting on "Viewer." Always double-check that the word "Editor" is explicitly displayed under the "Anyone with the link" header before you send the URL to your contacts.
Why Can't I Edit This Google Sheet? (Troubleshooting "View Only" Mode)
Even when you follow all the instructions perfectly, things can go wrong. One of the most common search queries related to Google Sheets is from users who have been sent a link but are stuck staring at a "View Only" badge in the top-left corner of their screen. If you or your collaborators cannot edit a sheet, one of the following issues is likely the culprit.
The "Wrong Account" Loop
This is the number one cause of permission errors. Many people have a personal Gmail account and a professional Google Workspace account. If a colleague shares a spreadsheet with your work email (`jane@company.com`), but your web browser is currently logged into your personal email (`jane.doe@gmail.com`), Google will block your access. The system sees that the account trying to open the link does not match the account on the permission list. To fix this, click your profile picture in the top right corner of Google and switch to the correct account, or open the link in an Incognito/Private browsing window and log in with the correct credentials.
The Storage Limit Issue
Google Sheets files take up space in the document owner's Google Drive. If the person who created the spreadsheet has completely filled up their Google Drive storage quota (typically 15GB for free accounts), the spreadsheet will freeze. Google will automatically convert the document to "View Only" for everyone—including the owner—until they delete files to free up space or purchase more storage.
Owner-Level Restrictions
If you are an Editor but find that you cannot share the document with someone else, it is not a glitch. As mentioned earlier, the document owner likely went into the advanced gear settings and unchecked the box that allows Editors to change permissions. You will need to ask the owner to invite the new person directly.
The "Published" vs. "Shared" Confusion
According to Google Help documentation, there is a massive difference between sharing a sheet and publishing it. If the URL you were sent ends in `/pubhtml`, the owner used the File > Share > Publish to web feature. This turns the spreadsheet into a static, read-only webpage. A published webpage can never be edited by viewers. The owner must send you the actual sharing link (which typically ends in `/edit`) instead.
How to Request Edit Access
If you are stuck in View Only mode, you don't need to send a separate email to the owner. Simply click the View Only button (or the "Request Edit Access" button) in the top menu bar. This will prompt you to type a short message. When you click send, Google will automatically email the owner with a button they can click to instantly upgrade your permissions to Editor.
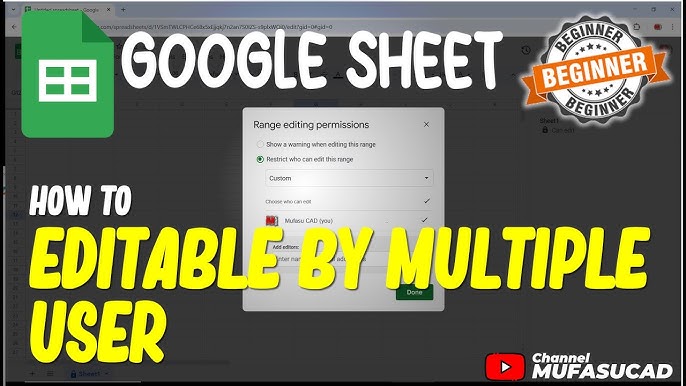
Image source: YouTube
How to Make Only Certain Cells Editable While Protecting the Rest
Making an entire spreadsheet editable is risky if you have spent hours building complex formulas, formatting headers, or creating charts. A single accidental keystroke from a collaborator can break a VLOOKUP formula and ruin the entire document. To prevent this, you should use the "Fillable Form" strategy: making the sheet editable, but locking down specific cells so they cannot be touched.
This technique, managed via the Protected Ranges feature, allows you to dictate exactly where users are allowed to type.
Step-by-Step Range Protection
If you want to protect your headers and formulas while letting people type in the blank rows beneath them, follow these steps:
- Highlight the cells, rows, or columns you want to lock (e.g., Row 1 containing your headers).
- Click Data in the top menu bar, then select Protected sheets and ranges.
- A sidebar will open on the right. Click Add a sheet or range.
- Give your protection a description (e.g., "Header Row"). The range you highlighted will already be populated in the text box.
- Click the green Set permissions button.
- In the popup window, choose Restrict who can edit this range.
- Click the dropdown menu and select Only you (or select "Custom" to allow specific trusted colleagues to edit it).
- Click Done.
Now, even if the entire document is set to "Anyone with the link can edit," if a user tries to type in your protected header row, Google Sheets will block them and display a warning message stating they do not have permission to modify those specific cells.
The "Input Cell" Visual Cue
When you lock down parts of a spreadsheet, it can be confusing for collaborators to know where they are actually allowed to type. A best practice in spreadsheet design is to use background colors as visual cues. For example, you might highlight all editable cells in a light yellow or pale blue color. You can then add a small legend at the top of the sheet that says: "Only type in the yellow boxes." This dramatically reduces user error and frustration.
Protecting Entire Tabs
If your workbook contains multiple tabs (e.g., a "Dashboard" tab with charts and a "Data Entry" tab), you can lock an entire tab. Click the small down arrow next to the tab name at the bottom of the screen, select Protect sheet, and set the permissions to "Only you." Collaborators will be able to view the Dashboard, but they will only be able to edit the Data Entry tab.
To further control what editors can do, combine editable cells with Data Validation. By highlighting an editable cell and clicking Data > Data validation, you can create a dropdown menu of pre-approved options. This prevents users from typing typos (like "Aproved" instead of "Approved") which would otherwise break your sorting and filtering formulas.
Advanced Formatting and Editing Mechanics
Once you have granted edit access, new users might struggle with the actual mechanics of editing a Google Sheet, especially if they are used to traditional word processors. Understanding a few basic editing mechanics can make collaboration much smoother.
The "Double-Click" Rule
A common mistake new editors make is clicking a cell once and starting to type. If the cell already contains text, typing immediately will overwrite the existing data. To add text to an existing cell without deleting what is already there, users must double-click the cell to place their text cursor inside it, or press the Enter key once the cell is highlighted.
Keyboard Shortcuts for Editors
According to Google's formatting documentation, one of the most frequently asked questions by new editors is how to create a line break inside a single cell. Pressing "Enter" simply moves the selection to the cell below. To add a new line of text within the same cell, editors must use a keyboard shortcut:
- Windows/Chromebook: Press
Ctrl + EnterorAlt + Enter. - Mac: Press
⌘ + EnterorOption + Enter.
Applying Global Themes
Editors don't just change text; they can change the entire look of the document. If you want to quickly standardize the colors and fonts across all tabs, charts, and pivot tables, an Editor can go to Format > Theme. This opens a sidebar where you can select pre-built color palettes or customize your own. Applying a theme ensures that any new data entered by collaborators automatically matches the document's professional styling.
Frequently Asked Questions
Final Thoughts
- Use "Anyone with the link" only for low-stakes, public data collection where user identity doesn't matter.
- Invite specific emails when handling sensitive information to ensure a secure, trackable audit trail.
- Check Version History regularly on public sheets to quickly identify and revert any accidental or malicious deletions.
- Verify your active account if you encounter a "View Only" error, as browser login conflicts are the most common cause.
- Lock formulas and headers using the "Protected sheets and ranges" feature to prevent collaborators from breaking your document.
- Color-code editable cells to provide clear visual cues, creating a foolproof "fillable form" experience for new users.