
How to Make a Folder a Subfolder in Outlook to Organize Your Inbox Faster
Managing a flooded inbox requires a reliable filing system. As email volume grows, a flat list of folders quickly becomes unmanageable, forcing you to scroll endlessly to find the right destination for a message. Learning how to make a folder a subfolder in Outlook allows you to build a logical hierarchy—grouping projects under clients, or specific years under general tax categories.
However, the process of nesting folders has become fragmented. With Microsoft currently supporting "Classic Outlook," the "New Outlook" transition, Outlook on the Web (OWA), and various mobile applications, the exact buttons you need to click depend entirely on which version you are looking at. This article provides precise, platform-specific instructions to help you organize your folder tree, alongside advanced troubleshooting steps for when folders seemingly disappear.
If you need to organize your inbox immediately, you can use one of these two primary methods across most desktop versions of Outlook:
- The Drag-and-Drop Method: Click and hold the existing folder you want to move. Drag it directly over the "Parent" folder until that parent folder highlights, then release your mouse button. The folder is now nested.
- The Right-Click Method: Right-click the parent folder where you want the new subfolder to live. Select "Create new subfolder" (or "New Folder" in older versions), type your desired name, and press Enter.
How to Make a Subfolder in the New Outlook and Outlook Web (OWA)
Microsoft has been steadily migrating users to the "New Outlook" for Windows, which shares its underlying codebase and user interface with Outlook on the Web (OWA). Because these platforms are virtually identical, the method for managing your folder hierarchy is the same across both.
Creating a New Subfolder from Scratch
If you are starting fresh and want to build a new category beneath an existing folder, the right-click context menu is your primary tool. According to Microsoft Support documentation, the process requires interacting directly with the navigation pane.
- Locate the folder you want to act as the "Parent" in your left-hand navigation pane.
- Right-click this parent folder. If you are using a touch device or prefer not to right-click, hover your cursor over the folder until the More Options icon (three horizontal dots) appears, and click that instead.
- Select Create new subfolder from the dropdown menu.
- A blank text box will appear slightly indented beneath the parent folder. Type your desired folder name.
- Press Enter on your keyboard or click anywhere outside the text box to save the new subfolder.
Moving an Existing Folder
If you already have a folder full of emails and you want to tuck it inside another folder, you do not need to create a new subfolder and manually move the emails. You can move the entire folder at once using the drag-and-drop method.
Click and hold the folder you wish to move. As you drag it up or down your folder list, pay close attention to the visual cues. When you hover over a potential parent folder, that folder will become highlighted (usually with a light blue or gray background). Once the correct parent folder is highlighted, release your mouse button. The folder, along with all its contents, will instantly nest inside.
Once a folder becomes a parent (meaning it contains at least one subfolder), a small expansion chevron (an arrow pointing right) will appear next to its name. Clicking this chevron rotates it downward and reveals the nested subfolders. If you do not see this arrow, the folder does not currently contain any subfolders.
Deep Dive: IMAP vs. Exchange Syncing
When you create a subfolder in the New Outlook or OWA, how quickly that folder appears on your other devices depends on your email account type. If you are using a Microsoft Exchange account (typical for corporate environments or Outlook.com), the folder hierarchy syncs instantly to the server.
However, if you are using an IMAP account (like a third-party Gmail or Yahoo account connected to Outlook), there may be a slight delay. IMAP protocols require the email client to "subscribe" to new folders. Occasionally, you may need to right-click your account name and select "IMAP Folders" to manually query the server and subscribe to the newly created subfolder if it fails to appear on your mobile device.
How to Create Subfolders in Classic Outlook for Windows
For users who have opted to remain on "Classic Outlook" (the traditional desktop application that comes with Microsoft Office), the interface relies heavily on the Ribbon menu at the top of the screen. While the drag-and-drop method still works perfectly here, creating new subfolders offers a more robust dialog box.
Using the Ribbon Menu
If you prefer using the top navigation ribbon rather than right-clicking, Classic Outlook provides a dedicated tool for folder creation.
- Navigate to the Folder tab located on the top Ribbon.
- Click the New Folder button in the "New" group.
- The "Create New Folder" dialog box will appear on your screen.
- In the "Name" field, type the title of your new subfolder.
- In the "Select where to place the folder" list, scroll through your existing folder tree and click on the folder that should act as the parent.
- Click OK.
The Critical "Folder Contains" Setting
When using the Classic Outlook dialog box, you will notice a dropdown menu labeled "Folder contains." By default, this is set to Mail and Post Items. It is critical to leave this setting as is when organizing your inbox. If you accidentally change this to "Calendar Items" or "Contact Items," Outlook will create a sub-calendar or a sub-address book instead of an email folder, which will not accept dragged-and-dropped emails.
Deep Dive: The Archive Strategy for Heavy Users
Classic Outlook users often build massive, deeply nested folder structures over years of use. While Outlook technically supports up to 10,000 folders, having thousands of subfolders in your primary mailbox can severely degrade the performance of your OST (Offline Storage Table) file. The more folders Outlook has to sync during a Send/Receive cycle, the slower the application becomes.
To maintain performance, implement an "Archive Strategy." Instead of keeping five years of nested project subfolders in your active inbox, create a separate Outlook Data File (.pst) or use your company's Online Archive. Replicate your subfolder hierarchy within the archive file, and move older parent folders there. This keeps your active Navigation Pane lean and ensures Classic Outlook boots up and syncs rapidly.
How to Manage Folder Hierarchy in Outlook for Mac
Outlook for Mac operates differently from its Windows counterparts, integrating more closely with macOS design principles. Managing your folder hierarchy here relies heavily on the sidebar.
The Right-Click Shortcut
To create a nested folder in the macOS version of Outlook, locate the intended parent folder in your left-hand sidebar. Right-click (or Control-click) the folder and select New Folder from the context menu.
Unlike the Windows versions that immediately prompt you with a text box, Outlook for Mac will instantly generate a nested folder temporarily named "Untitled Folder." The text of this new folder will be highlighted, allowing you to immediately type your desired name and press Return to save it.
Deep Dive: Naming Conventions and ASCII Sorting
Regardless of whether you use Mac or Windows, Outlook sorts subfolders alphabetically by default. If you have a parent folder called "Clients" and you create a subfolder called "Zeta Corp," it will always sit at the bottom of the list, even if it is your most active client.
To force important subfolders to the top of your hierarchy, you must understand how Outlook reads the ASCII character set. Outlook prioritizes symbols over numbers, and numbers over letters. You can manipulate this to your advantage by using specific naming conventions:
- Symbols: Naming a folder
!_Urgent Projectsor@Action Itemswill force it to the absolute top of the subfolder list. - Numbers: Using a numbering system like
01_Q1 Reports,02_Q2 Reportsensures folders stay in chronological order rather than alphabetical order.
How to Move a Subfolder Back to a Top-Level Folder
One of the most common frustrations when managing an inbox is the "Reverse Move" problem. It is incredibly easy to accidentally drag a folder slightly too far to the right, inadvertently dropping it inside another folder and turning it into a subfolder by mistake. Once a folder is nested, how do you "un-nest" it and promote it back to a top-level folder?
The "Account Name" Drop Zone
You cannot simply drag a subfolder into the empty white space of the navigation pane to make it a top-level folder. Instead, you must drag it to a specific "Drop Zone."
To promote a subfolder back to the main hierarchy, click and hold the subfolder. Drag it all the way up to the very top of your folder list and drop it directly onto your Email Account Name (or your email address, depending on how your profile is configured).
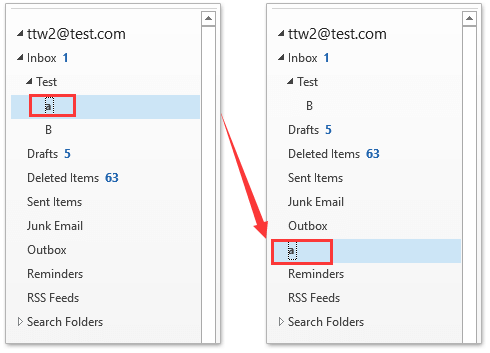
Image source: ExtendOffice
When you release the mouse button over your account name, Outlook will remove the folder from its parent and place it alphabetically among your primary top-level folders (like Inbox, Sent Items, and Drafts).
Can You Create Subfolders in the Outlook Mobile App?
Managing folders on the go presents a significant challenge. If you are using the official Microsoft Outlook app for iOS or Android, you will quickly notice that the "New Folder" button is entirely missing from the interface.
The Official Limitation
Currently, the native Outlook mobile applications do not support the creation of new folders or subfolders. You can view your existing hierarchy, and you can move emails into existing subfolders, but you cannot alter the folder structure itself from within the app.
The "Pro" Mobile Workaround
If you are traveling without a laptop and absolutely must create a subfolder, community power-users have developed a reliable workaround using your smartphone's web browser.
- Open your preferred mobile browser (Safari on iPhone, Chrome on Android).
- Navigate to
outlook.live.com(oroutlook.office.comfor corporate accounts) and log in. - By default, the mobile web view also restricts folder creation. You must bypass this by opening your browser's settings menu and selecting Request Desktop Site (or "Desktop Website").
- The page will reload, displaying the tiny, desktop version of Outlook Web on your phone screen.
- Pinch and zoom to navigate to your folder pane, long-press (or tap) to simulate a right-click on the parent folder, and select Create new subfolder.
- Once created, close your browser and open the Outlook Mobile App. Pull down on your inbox to force a sync, and your new subfolder will appear.
Deep Dive: Shared Mailboxes and Permissions
Another scenario where users find themselves unable to create subfolders is when working within a Shared Mailbox (e.g., info@company.com). If you right-click a folder in a shared inbox and the "Create new subfolder" option is grayed out or missing, you are facing a permissions issue.
In Microsoft Exchange, simply having access to read a shared mailbox does not grant you structural control. To create subfolders, your IT administrator must grant you at least "Author" or "Editor" level permissions for that specific mailbox. If you only have "Reviewer" permissions, you can read emails but cannot alter the folder hierarchy.
Why Did My Outlook Subfolders Disappear?
A frequent issue reported in technical support communities is the sudden disappearance of subfolders. Users often panic, assuming they have accidentally deleted years of organized emails. However, if you can still see the missing folder when you try to use the "Move To" button on an email, the folder is not deleted—your Navigation Pane is simply experiencing a graphical glitch.
The "Hidden Chevron" Issue
Before attempting technical fixes, ensure the parent folder isn't simply collapsed. In the New Outlook, the expansion chevron (the small arrow next to the folder name) can sometimes blend into the background or disappear if you aren't actively hovering over the folder pane. Hover your mouse directly to the left of the parent folder's name to see if the arrow appears, then click it to expand your subfolders.
The Reset Navigation Pane Command
If the folders are genuinely missing from the visual list but still exist in the system, you can force Outlook to rebuild the folder tree using a command-line switch. This is a safe, standard troubleshooting step recommended by Microsoft professionals.
- Close the Outlook desktop application completely.
- Press the Windows Key + R on your keyboard to open the Run dialog box.
- Type the following command exactly as written:
outlook.exe /resetnavpane - Press Enter. Outlook will launch, and it will completely rebuild the visual folder hierarchy, which typically restores any "invisible" subfolders.
Alphabetical Stabilization and Cache Issues
If the reset command does not work, try right-clicking your main email account name at the top of the folder list and selecting Sort Subfolders A-Z. This forces the application to re-index the visual list, often popping missing folders back into view.
Additionally, if you are using Classic Outlook, your local cache might be out of sync with the server. Navigating to File > Account Settings > Account Settings, double-clicking your email, and temporarily disabling Cached Exchange Mode will force Outlook to read directly from the server, bypassing any corrupted local folder data.
| Feature | Classic Outlook | New Outlook / OWA | Outlook Mobile |
|---|---|---|---|
| Primary Creation Method | Folder Tab > New Folder | Right-click > New Subfolder | Not natively available |
| Drag & Drop Nesting | Fully Supported | Fully Supported | Not Supported |
| Troubleshooting Tool | /resetnavpane command | Browser refresh / Clear Cache | Force App Sync |
| Workaround Required? | No | No | Yes (Desktop Site mode) |
How to Automate Your New Subfolders with Rules
Creating a logical folder hierarchy is only the first step. If you are manually dragging and dropping every single email into your new subfolders, you are wasting valuable time. To achieve a truly organized inbox, you must pair your subfolders with automated Rules.
The "Subfolder + Rule" Combo
According to IT documentation from institutions like Alamo Colleges, the most efficient way to manage email is to let the server do the sorting for you. Once you have created a subfolder for a specific sender, project, or automated report, you should immediately create a rule to route future emails there automatically.
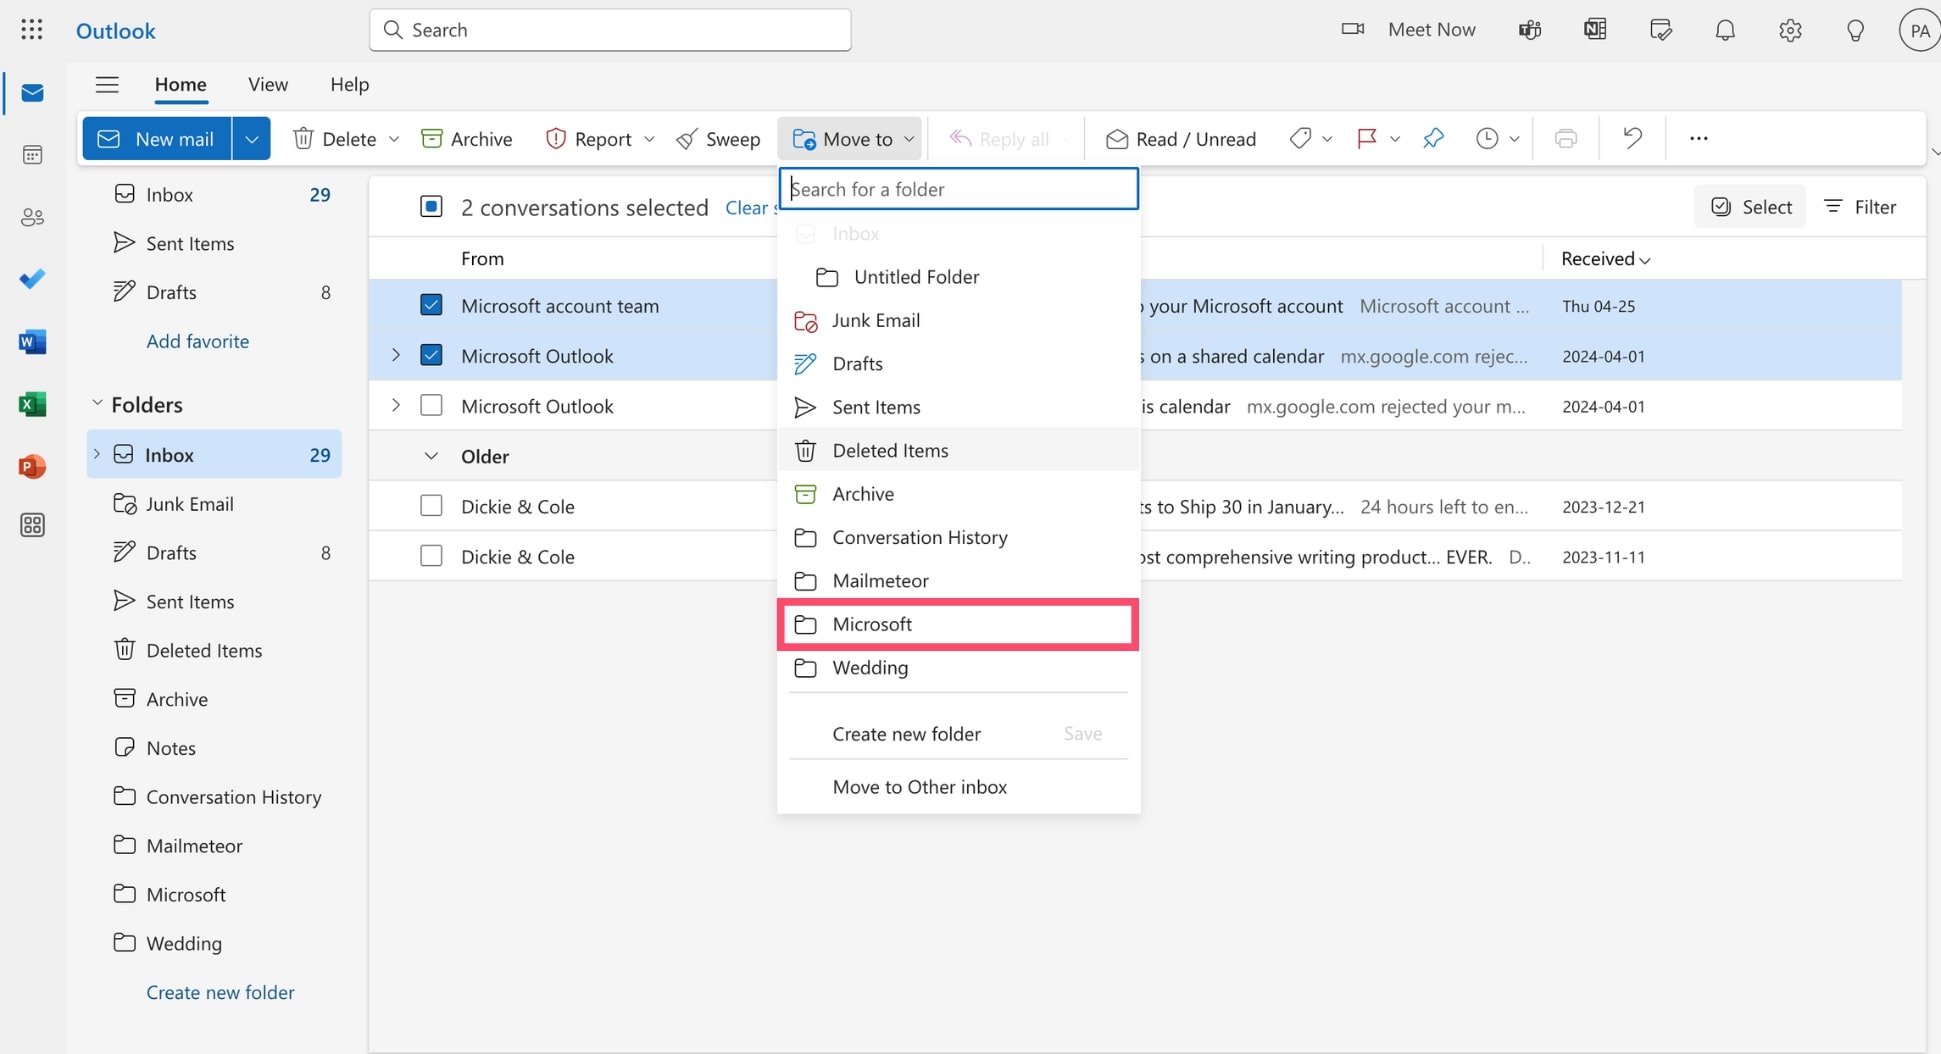
Image source: Mailmeteor
Step-by-Step Rule Creation
To automate the filing process into your newly created subfolder:
- Find an existing email in your inbox that belongs in your new subfolder.
- Right-click the email and hover over Rules.
- Select Always move messages from: [Sender Name].
- A dialog box will appear displaying your folder tree. Locate and select the subfolder you just created.
- Click OK.
From this point forward, any email arriving from that specific sender will bypass your main inbox entirely and drop directly into the designated subfolder. A bold number will appear next to the subfolder indicating how many unread automated messages are waiting for your review.
Frequently Asked Questions
Technically, Outlook supports up to 10,000 total folders per mailbox, and you can nest them dozens of levels deep. However, practically speaking, you should avoid nesting folders more than three or four levels deep. Excessive nesting makes it difficult to navigate the folder tree and can cause synchronization delays, especially on mobile devices and IMAP connections.
No. When you drag and drop an existing folder to make it a subfolder, all of the data inside that folder—including emails, attachments, and any existing sub-subfolders—moves with it safely. The folder structure is simply relocated within the database; no deletion occurs during this process.
If Outlook prevents you from dragging and dropping a folder, it is usually due to one of two reasons: either you are trying to move a default system folder (like Inbox or Sent Items, which cannot be moved), or you are experiencing a permissions error in a Shared Mailbox. Additionally, if an email within that folder is currently open in another window, the folder may be locked until you close the message.
Yes, as long as your email account is configured using Microsoft Exchange or IMAP. These protocols sync your folder hierarchy directly with the server, meaning any subfolder created on your desktop will eventually appear on your phone. If you are using the outdated POP3 protocol, folders will not sync across devices.
Renaming a subfolder is identical to renaming a top-level folder. Simply right-click the subfolder in your navigation pane and select "Rename" from the context menu. Type the new name and press Enter. The folder will immediately re-sort itself alphabetically based on the new name you provided.
Final Thoughts
Organizing your Outlook inbox is ultimately about reducing the time you spend sifting through irrelevant messages. By mastering folder hierarchy, you can transform a chaotic inbox into a structured filing system.
- Use Drag-and-Drop to quickly nest existing folders inside one another without having to move individual emails.
- Right-click the parent folder to create brand new subfolders from scratch in both Classic and New Outlook.
- Drag to your Account Name at the top of the navigation pane to un-nest a subfolder and return it to the top level.
- Use the Desktop Site workaround on your mobile browser if you urgently need to create a folder while away from your computer.
- Run the /resetnavpane command if your subfolders mysteriously disappear from the visual interface but still exist in the system.
- Automate your hierarchy by pairing your new subfolders with Rules to automatically route incoming mail.
